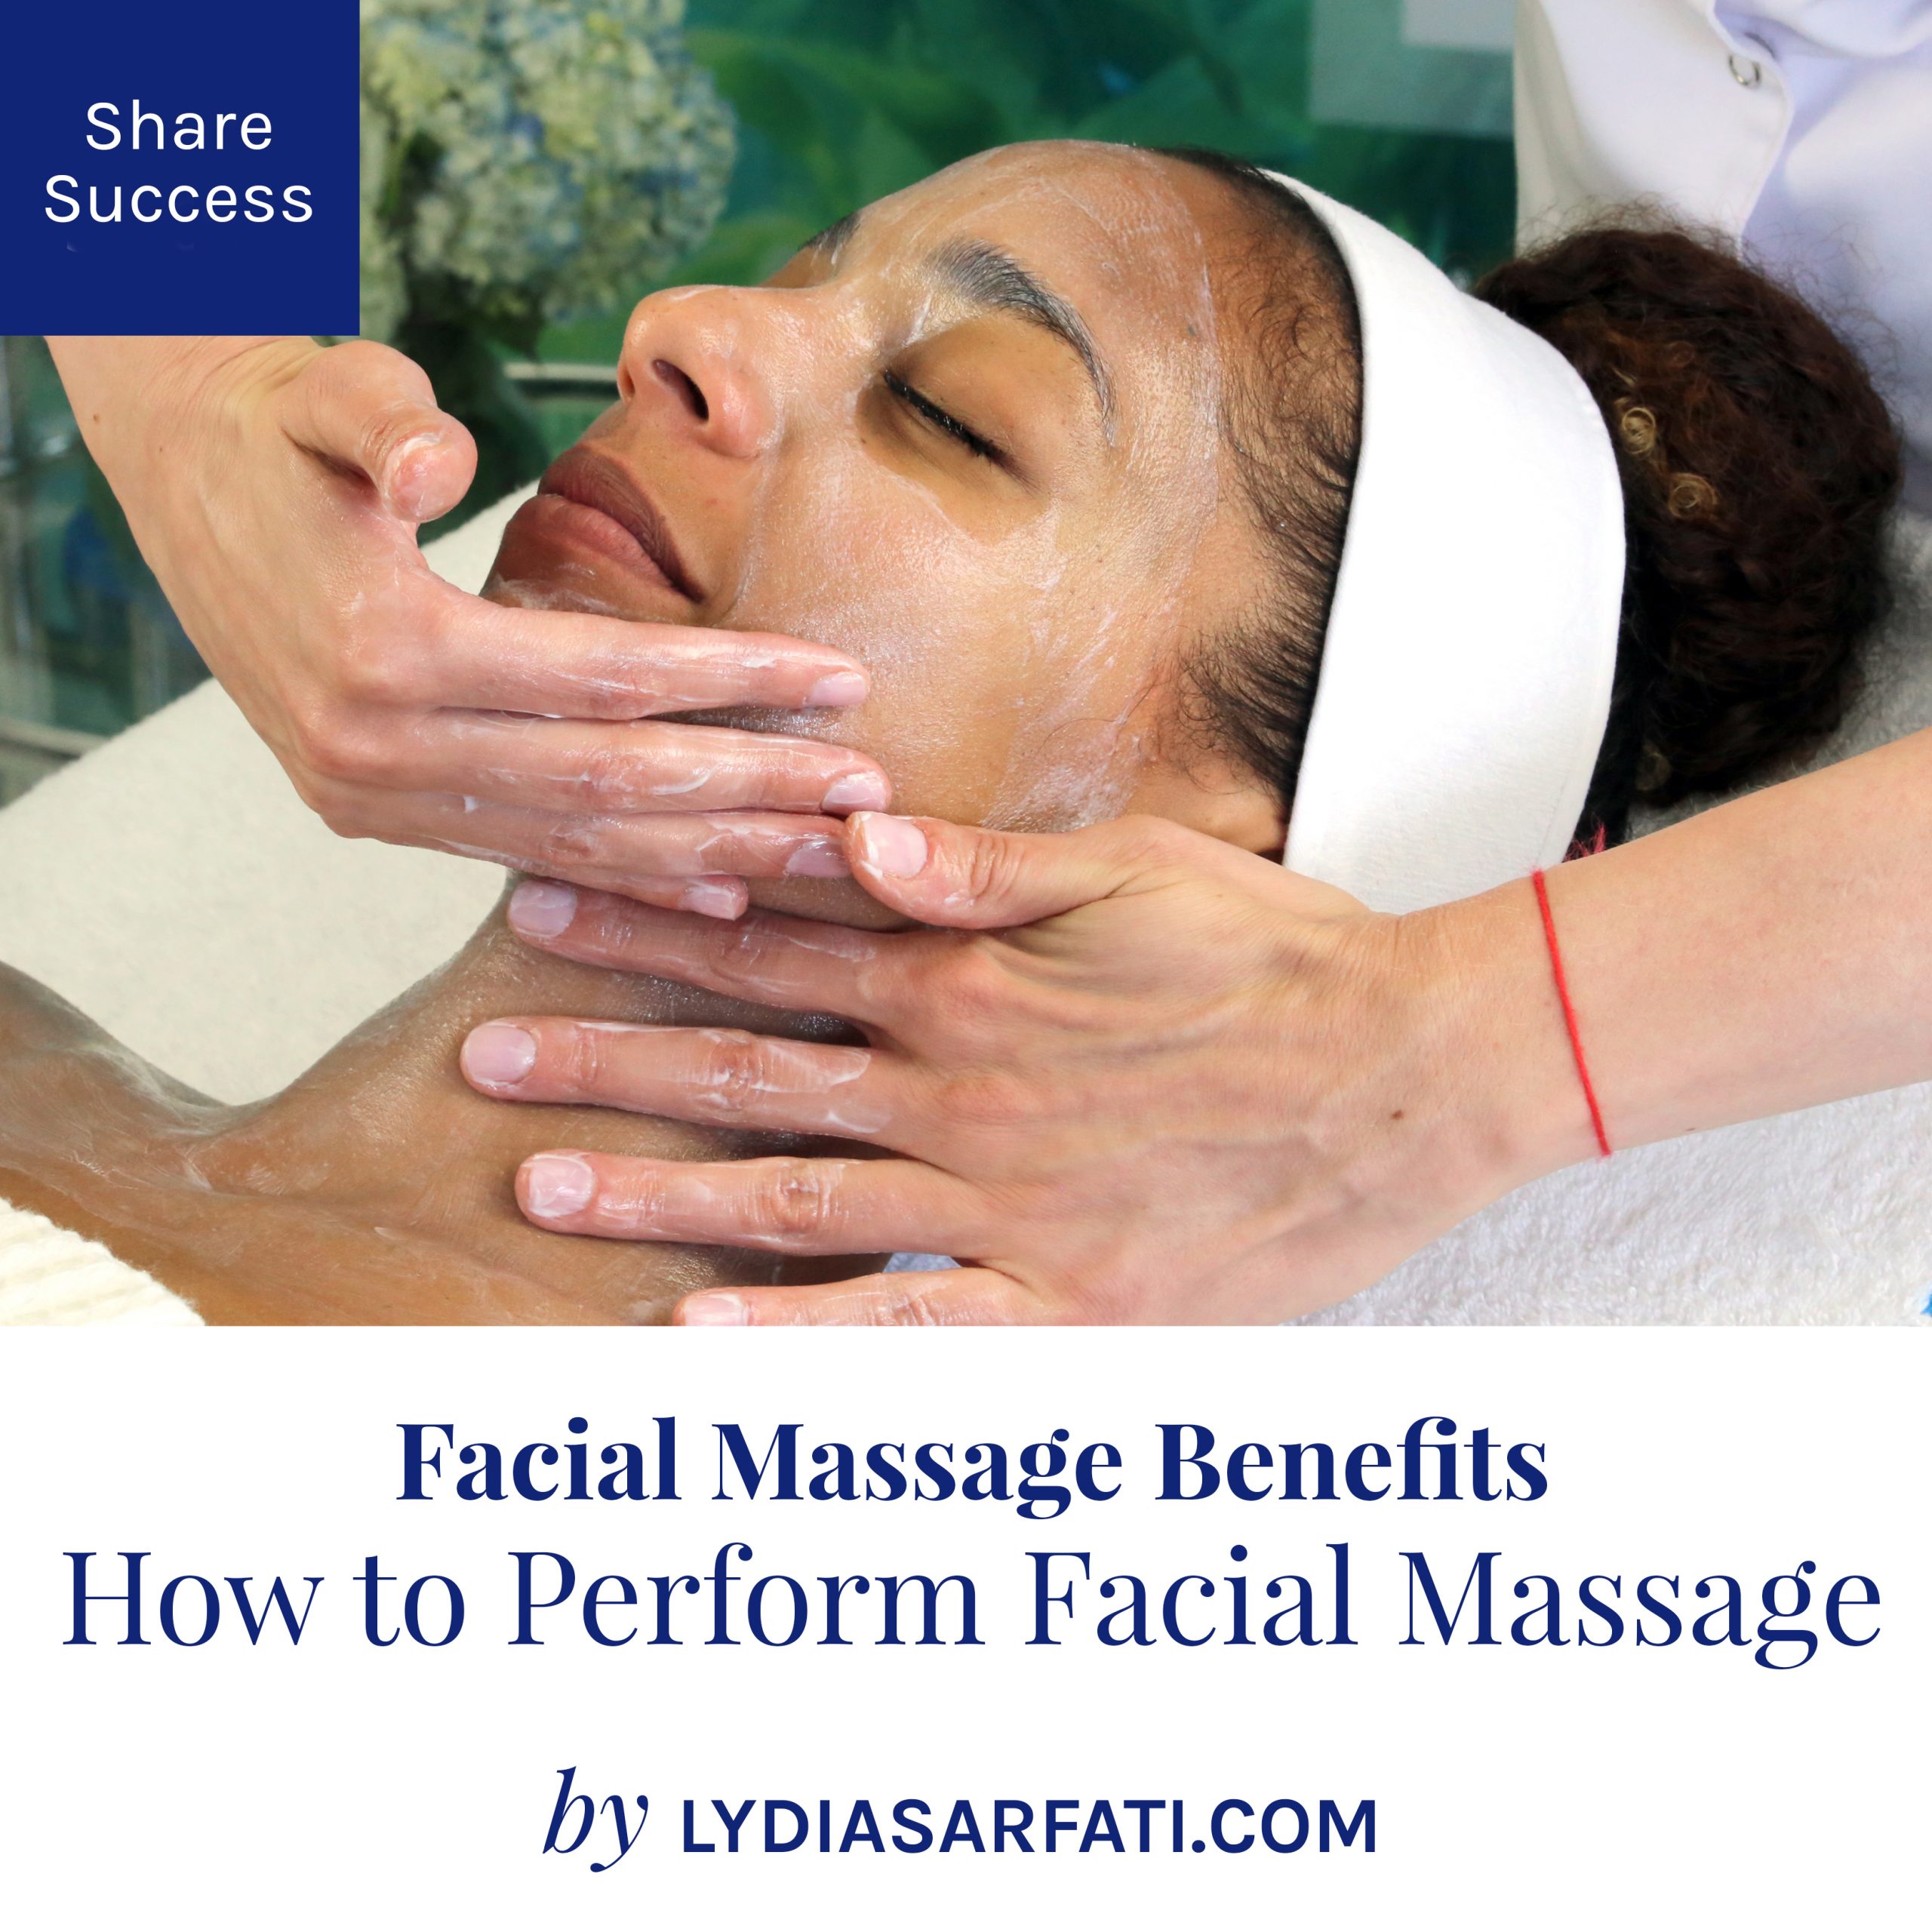

Facial massage has a plethora of benefits for your client’s appearance and health. When done correctly, facial massage helps to provide your clients with glowing, healthy looking complexions. Educating yourself and practicing perfect techniques will allow you to provide your clients with superior results which will in turn create fans for life.
Benefits of Facial Massage:
- Improves the appearance of the skin
- Purifies
- Stimulates
- Relaxes
- Refreshes skin
- Gives physiological and psychological benefits
- Reduces the appearance of wrinkles
- Hydrates the skin resulting in a fabulous glow
- Increases lymphatic flow
- Eases muscle tension
- Helps to improve overall well-being
Contraindications for Massage Include:
- Skin conditions such as redness, swelling, pus, disease, bruises and/or broken scraped skin
- Previous stroke
How to Administer Facial Massage
To administer a complete and effective facial massage, you must have knowledge of ALL muscles, bones, and systems and one must also understand the placement of the facial muscles (For scientific overview, see Lydia Sarfati Facial Massage Instructional DVD.)
Never remove your hands from the client’s face once you make contact with the skin. Unbroken contact feels better and gives the client a sense of physical continuity that is very soothing and more relaxing.
Why stroke outward? You’ll notice that many skin care instructions insist on upward and outward strokes. This is because inward strokes actually weakens the skin causing premature folds and wrinkles. With outward strokes, the skin is not inwards.
The insertion is the fixed attachment (immovable) of the muscle to the bone. The origin is the immovable attachment of the muscle to another muscle or cartilage. The pressure of the massage movement is from insertion to origin.
Facial Massage Techniques
*Recommended for normal skin types *Contraindications for rosacea/acne skin
To administer a complete and effective facial massage, one should employ five forms of hand manipulation. This style of massage should involve a rhythmic movement to the skin and tissues and as such, usually requires a massage medium that will allow enough slip to complete the massage comfortably and successfully.
Effleurage These strokes improve circulation in the blood vessels near the surface of the skin. Once you begin Effleurage, your hands must never leave the face.
Petrissage is a compression technique, which includes kneading, squeezing and pinching. This affects the deeper muscle tissue of the face.
Tapotement is a percussive stroke in which the fingertips strike the skin in rapid succession. This technique improves circulation by stimulating the diffusion of the capillary network. It helps nourish the skin. This technique also purifies the skin.
Friction is an invigorating technique, stimulating circulation and glandular activity. It can be performed in a circular manner or a criss-cross manner with the fingers working in opposition to each other.
Vibration is a highly stimulating movement and should be used very sparingly. This is a shaking movement and is performed over areas of broad muscle mass. In the facial massage this is the lower part of the face.
End the massage by focusing on the motor points of the face. Knowledge of neuromuscular anatomy is necessary to locate the regions of motor nerves. Applying pressure to facial motor points stimulates the muscle and relieves tension. See the complete massage technique on the Lydia Sarfati Facial Massage Instructional DVD.
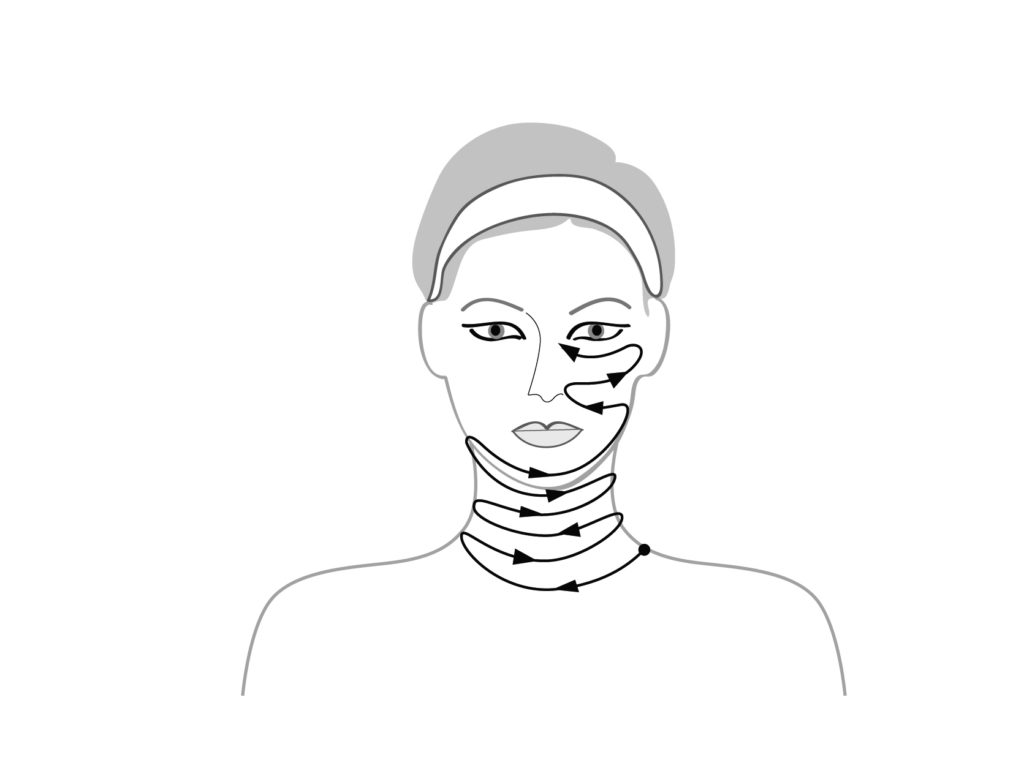
Step 1: Effleurage
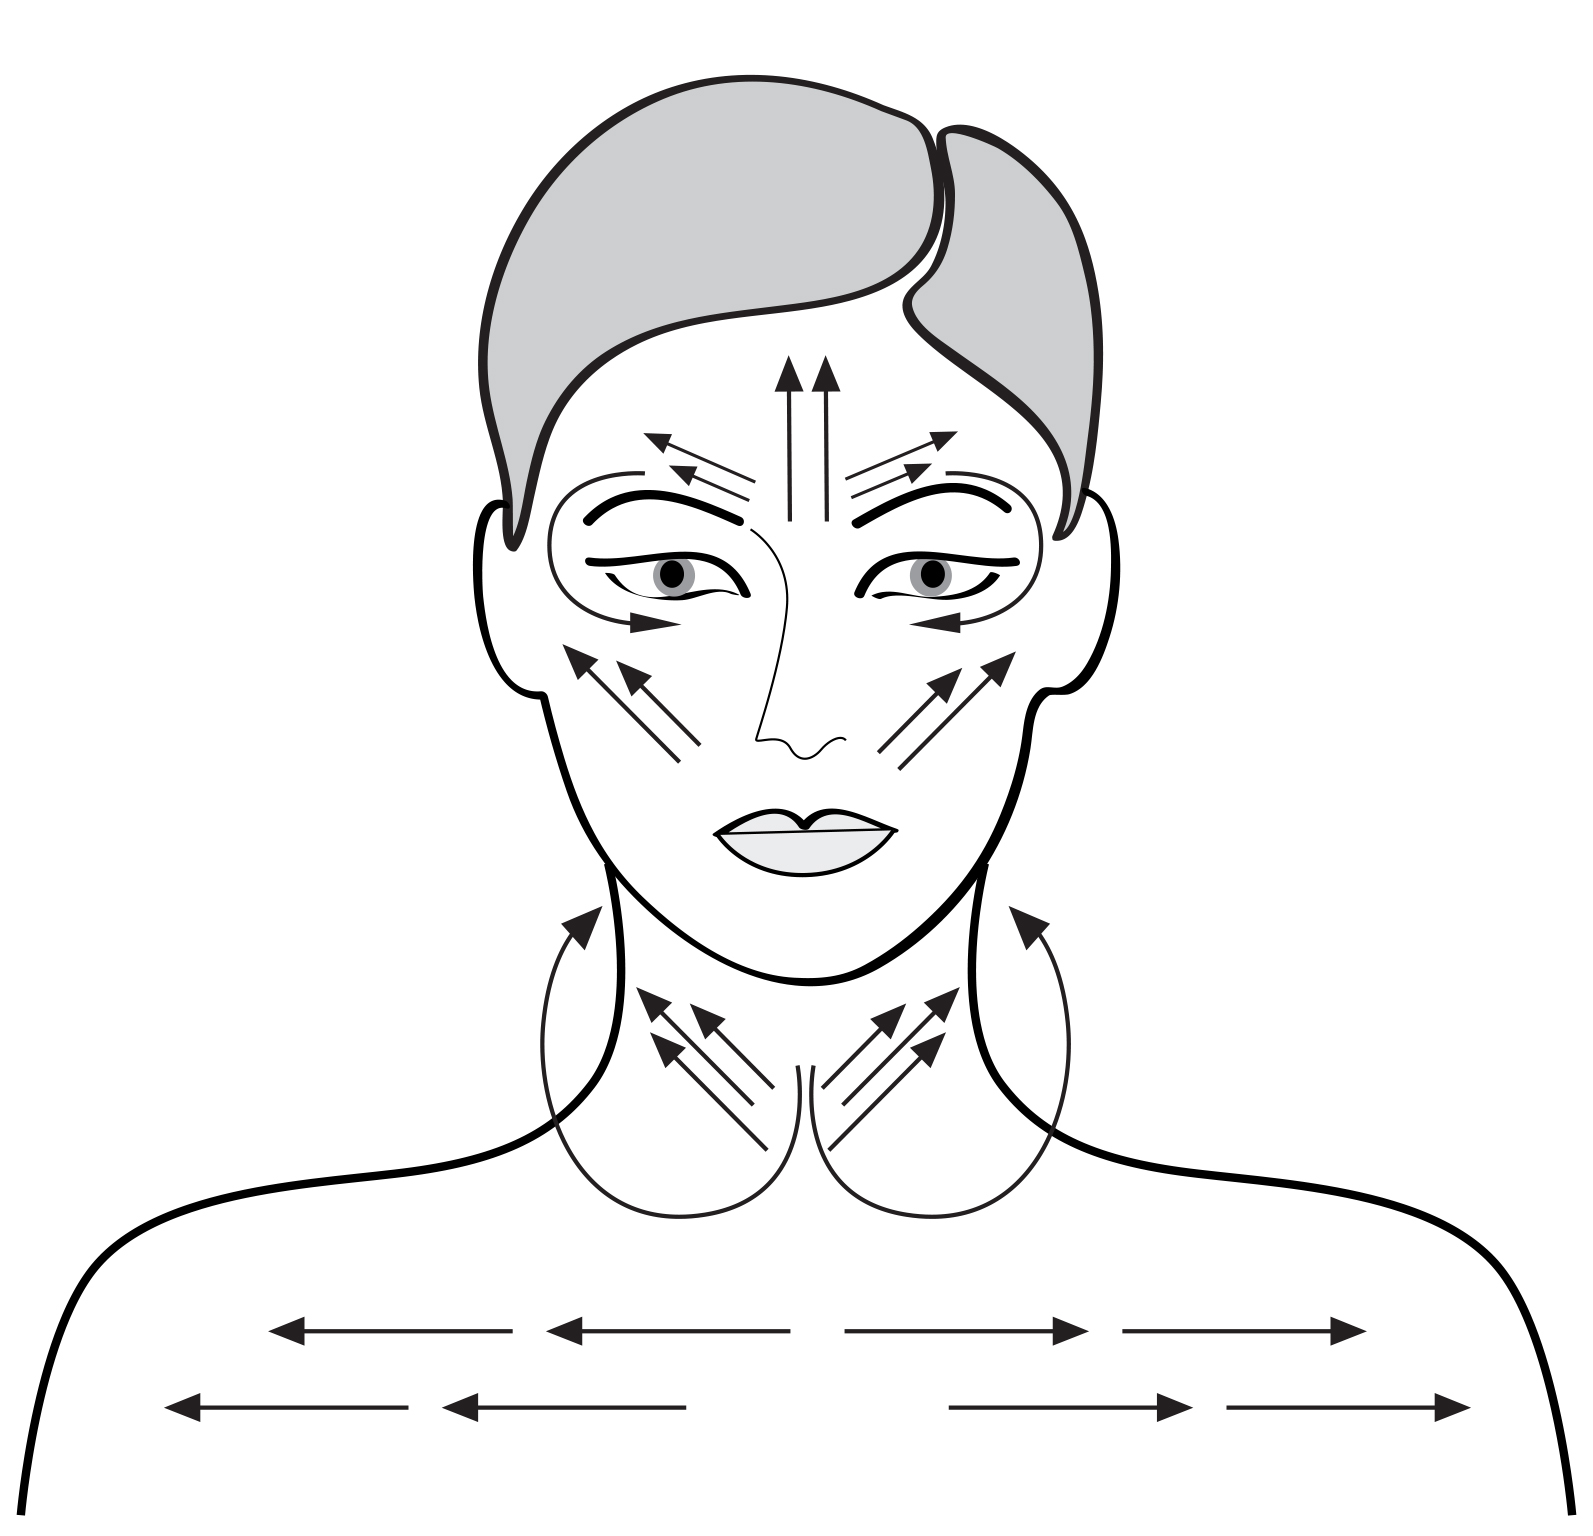
Apply massage cream to chest and use upward and outward strokes across upper chest, up through the nexk, across the chin and up onto the cheeks. Circle around the outer corners of the eyes then up and out through the forehead.
Step 2: Petrissage
Starting in the center of the forehead in between the eyes, crisscross fingers as you massage towards the hairline. Repeat to middle of the forehead, toward bridge of nose. Cross over right eyebrow to temple. Return to same spot by hairline. Repeat entire process over left eyebrow to the left temple.
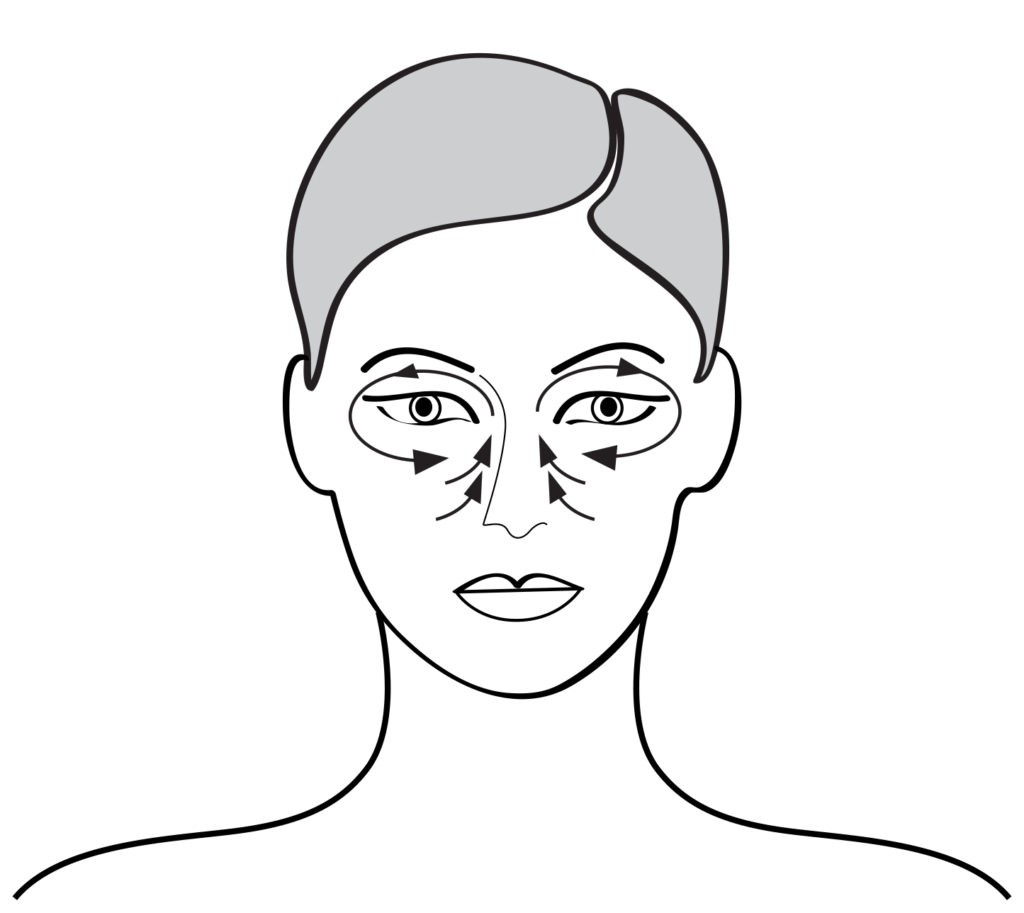
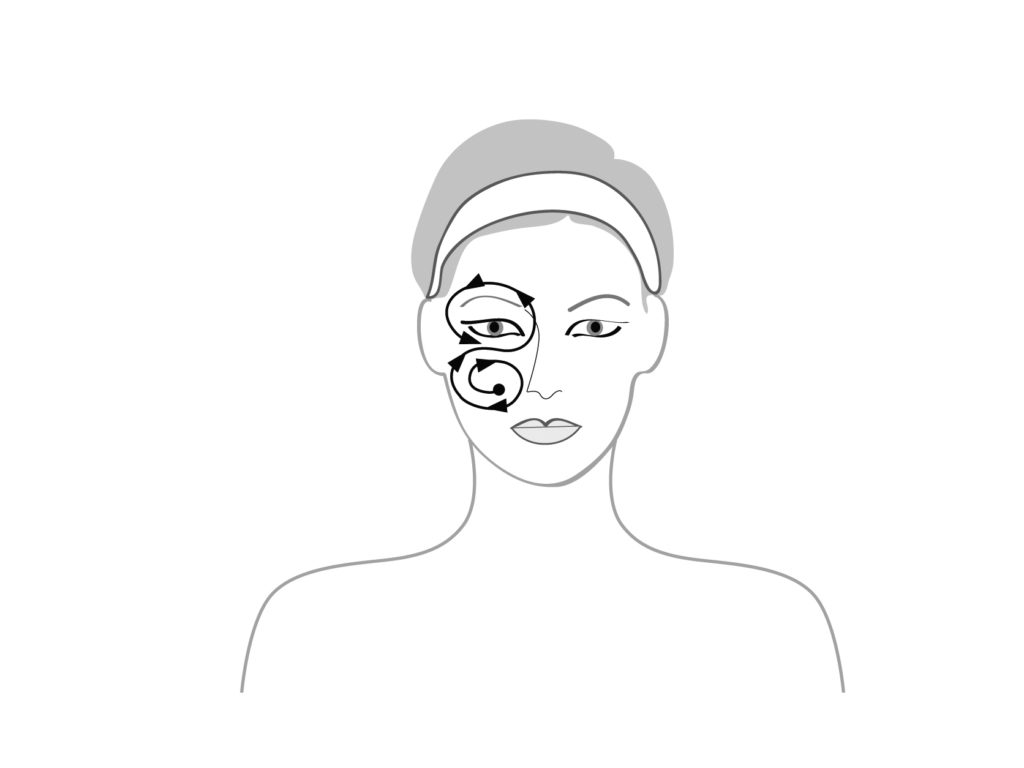
Step 3: Circular Outward Movements
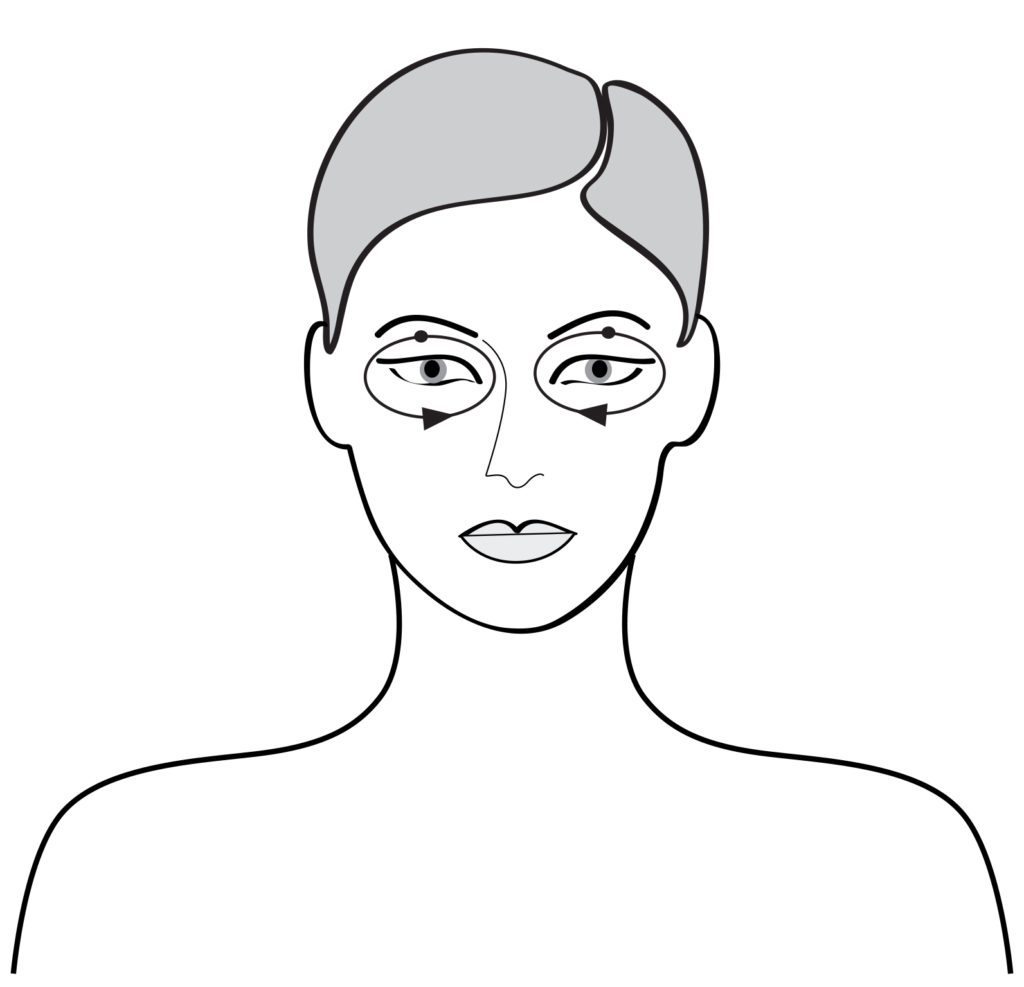
Using your fingertips, create outward circular movements on forehead above each eye. At the temple, reverse the circular movement, and move toward the nose, under the eyes, until you reach the bridge of the nose.
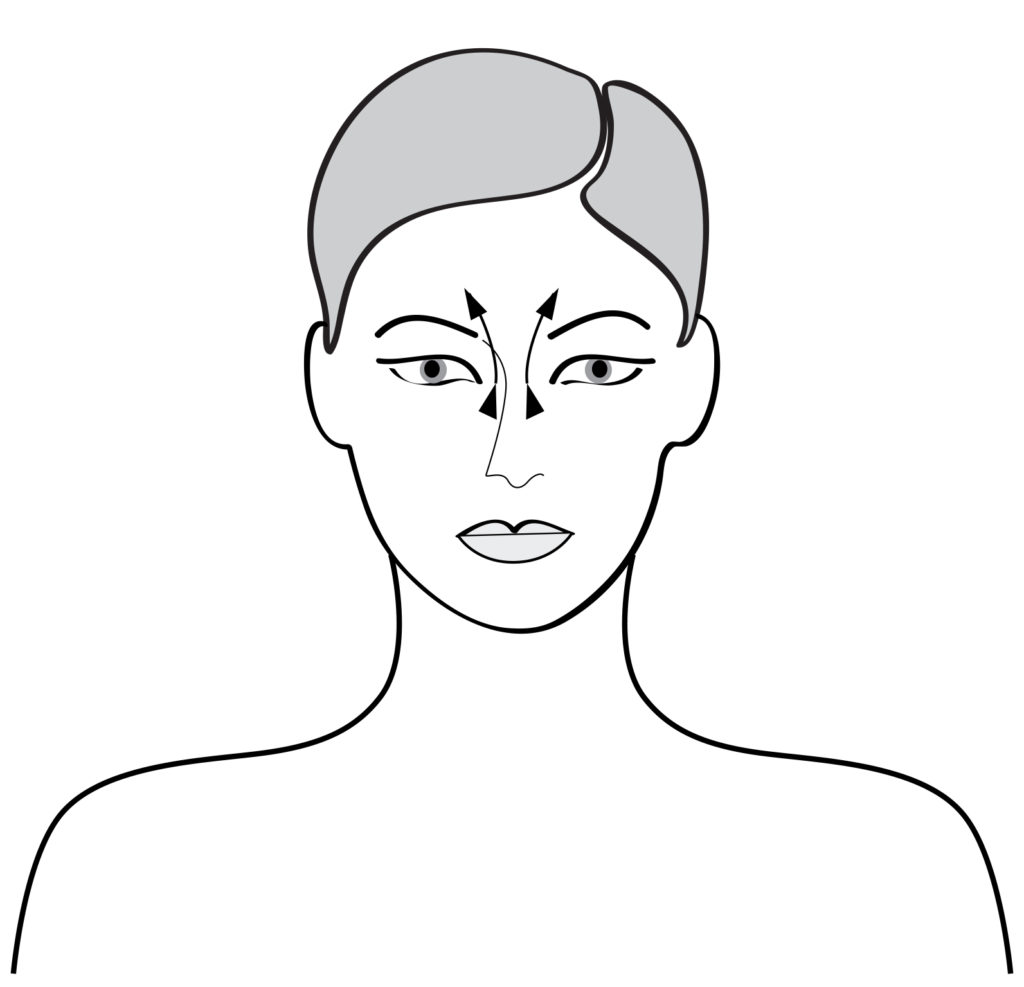
Step 4: Effleurage – Step Up

With your middle finger on the side of the nose, use the pads of your index finger to apply slight pressure, “stepping up” the bridge of the nose to the corrugator.
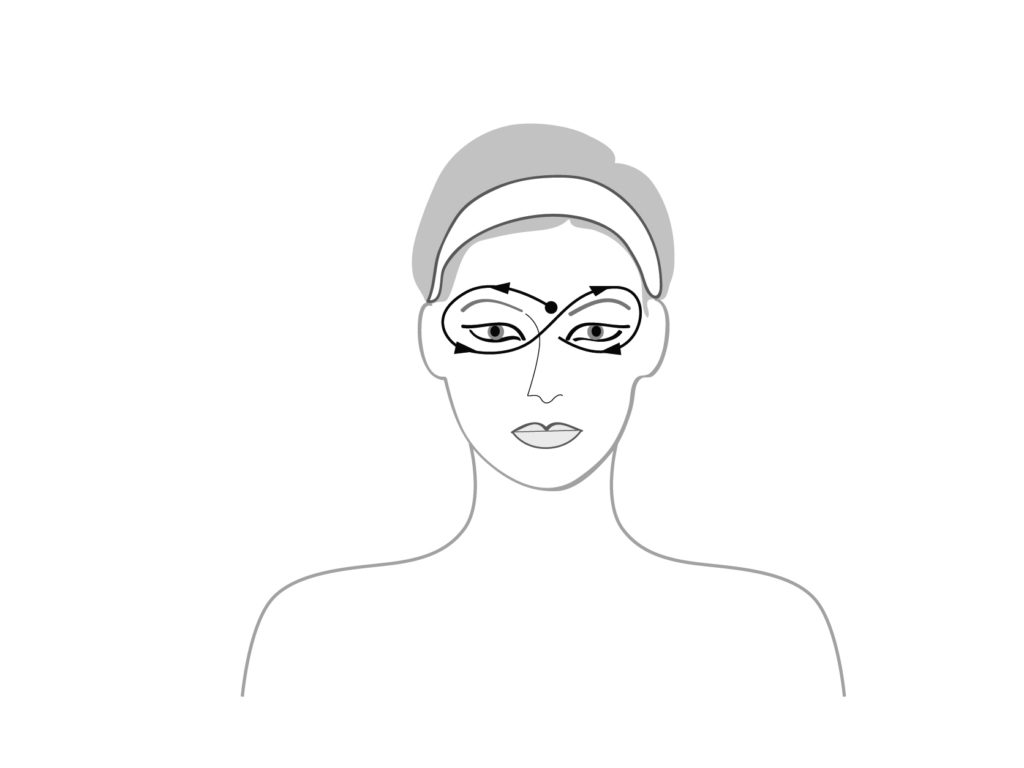
Step 5: Effleurage-Figure 8
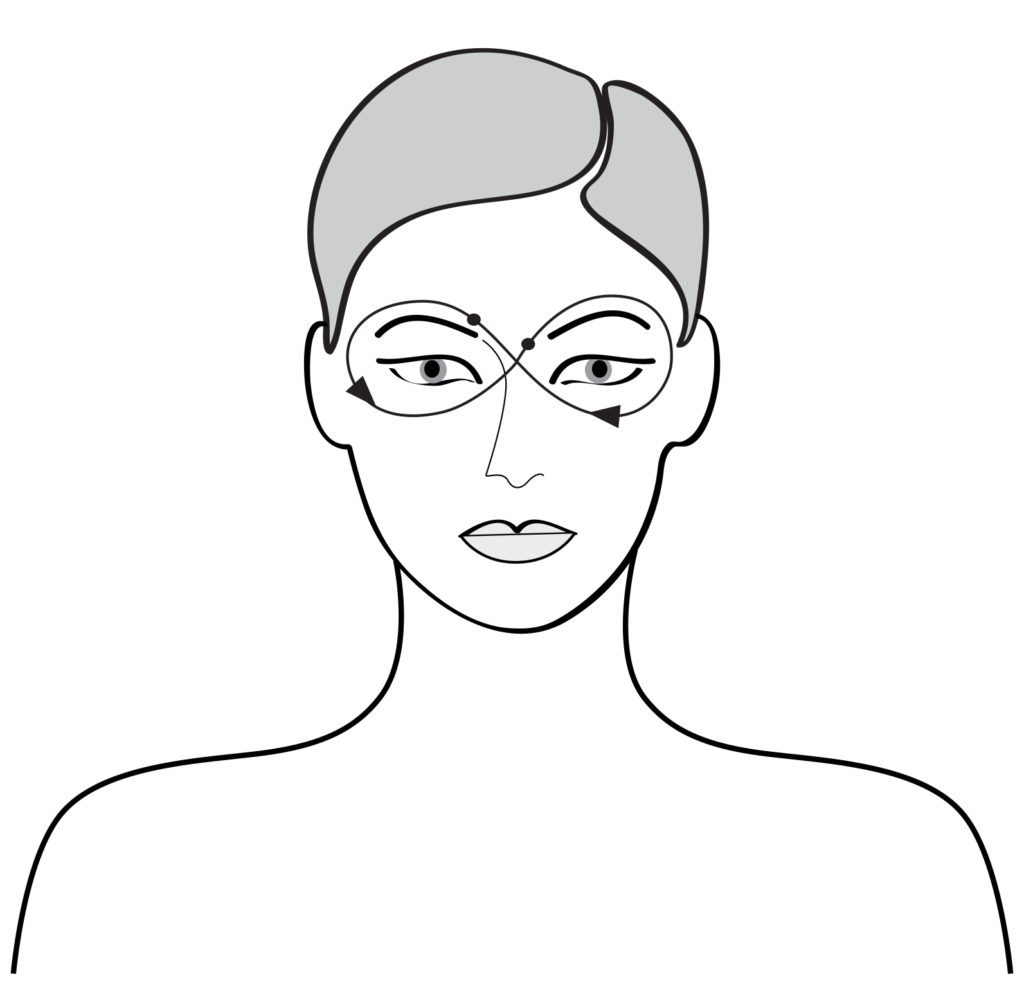
Place the thumb of one hand on the center of client’s forehead. With index finger of other hand make a large “Figure 8” around the eyes. Repeat three times. Switch hands and repeat entire process.
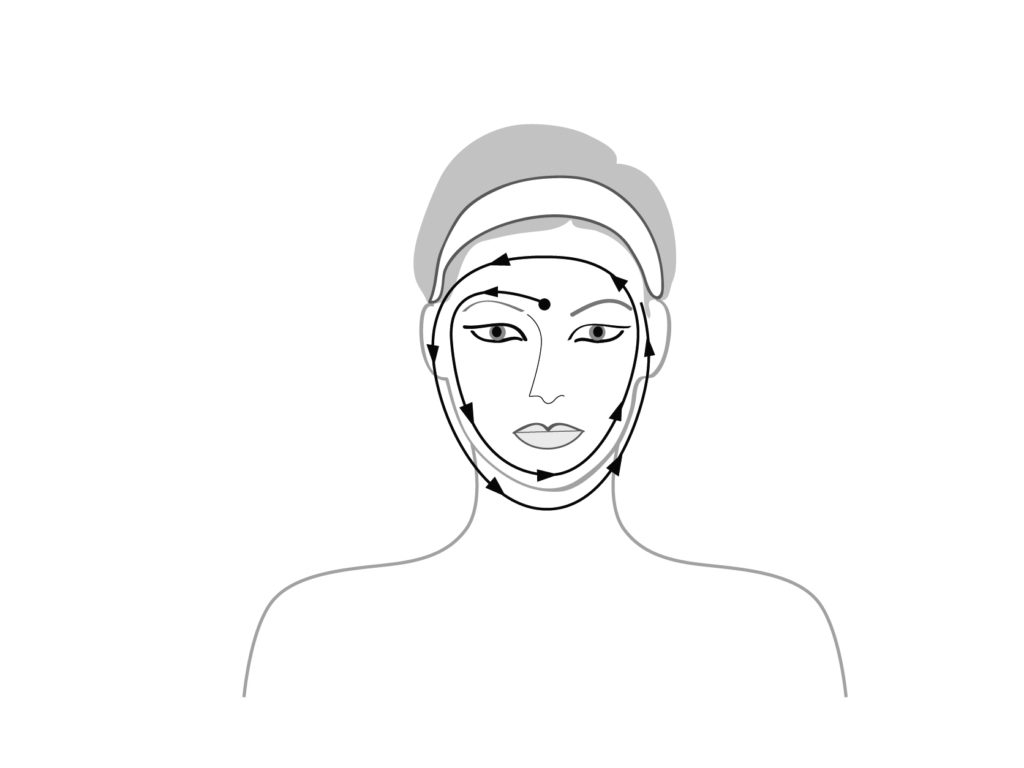
Step 6: Effleurage-2 Circles

Circle the eyes once. Cross over right eyebrow to temple. Make second circle around the forehead. Repeat the two-step procedure twice.
Step 7: Tapotement
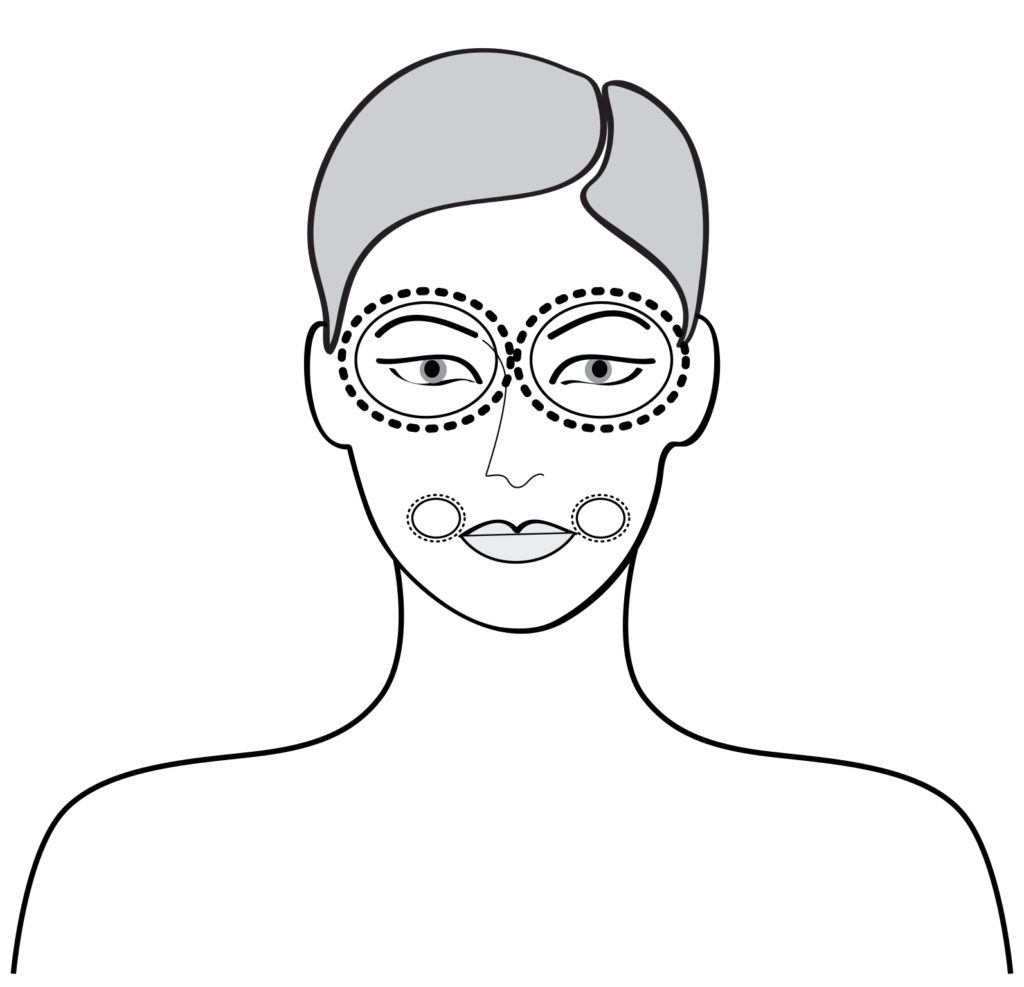
Perform “piano” light tapping massage movement around the eyes and then around the cheeks.
Step 8: Vibration
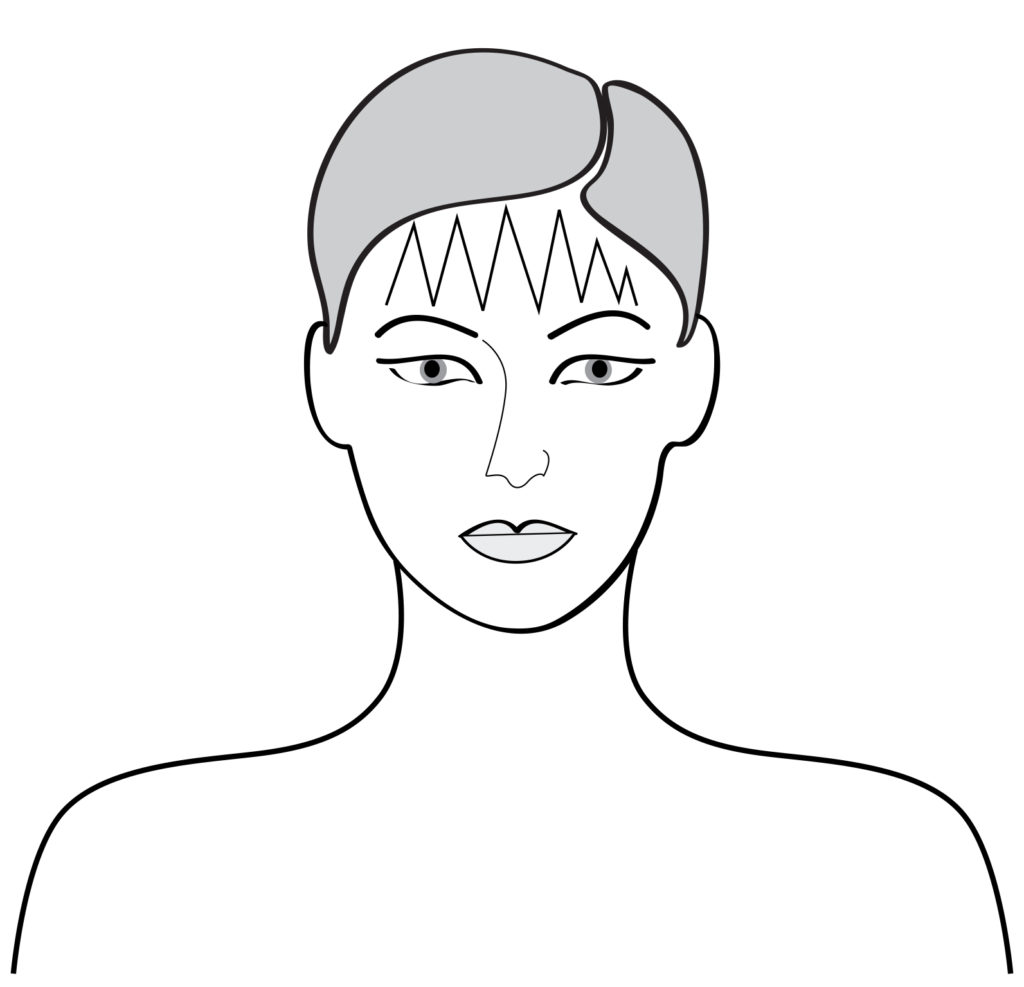
Using the fingertips, create rapid zigzag movements across the forehead to help relax muscles.
Step 9: Effleurage Full Circle
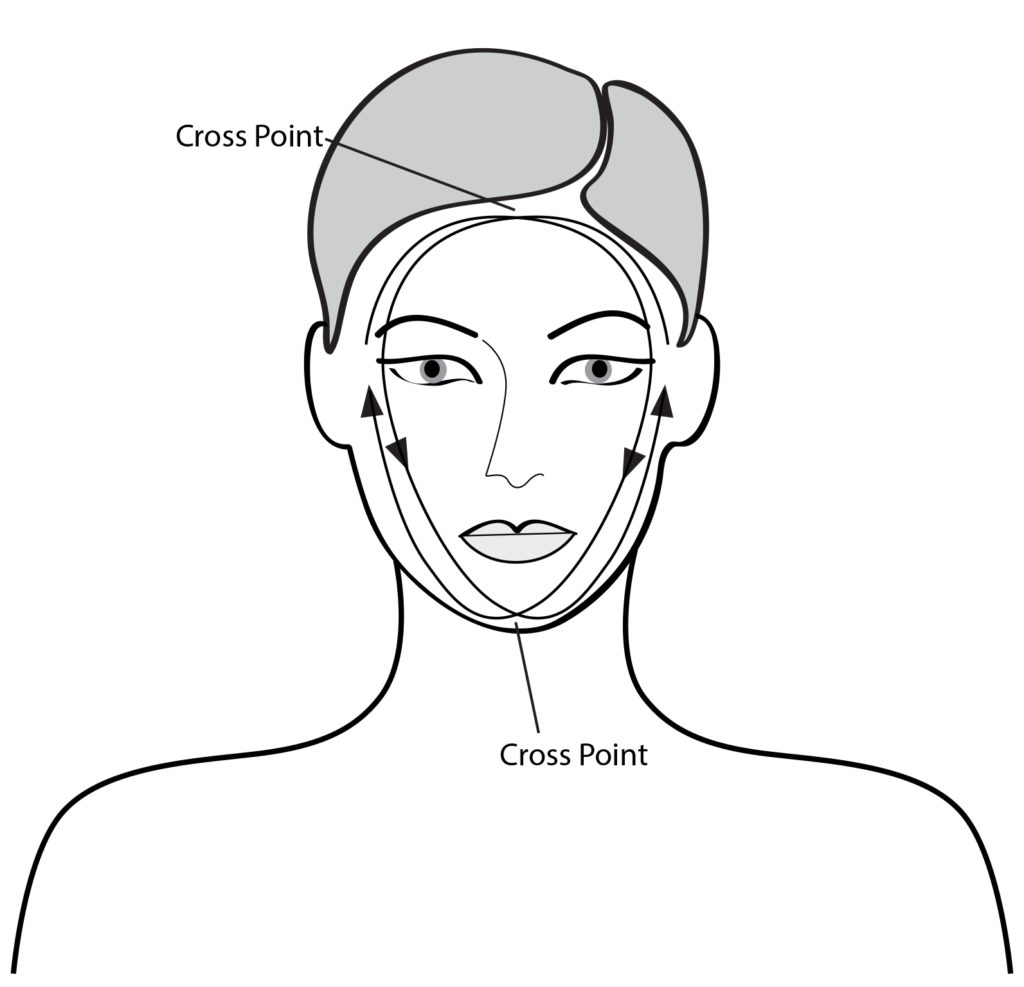
Using the middle fingers of both hands, circle the client’s face, first moving down towards the chin, then outward and upward onto the cheeks. Your fingers should go outside the eyebrows, with your hands meeting at the center of the forehead. Repeat twice, ending with fingers at the chin.
Step 10: Kneading
Using knuckles in circular movements, apply light pressure on the cheeks and jaw to help improve circulation.
Step 11: Effleurage

Using middle fingers, perform circular movements around the eyes. Repeat 3 to 5 times.
Step 12: Effleurage
Transition hands from Step 11 by gently moving fingers back to the cheeks using circular movements. Move up the bridge of the nose, then around eyes.
Step 13: Effleurage

Repeat Step 9, using the middle fingers of both hands, circle the client’s face, first moving down towards the chin, then outward and upward onto the cheeks. With the fingers should go outside the eyebrows. Hands will meet at center of the foreheads. Repeat twice, ending with fingers at the chin.
Step 14: Effleurage
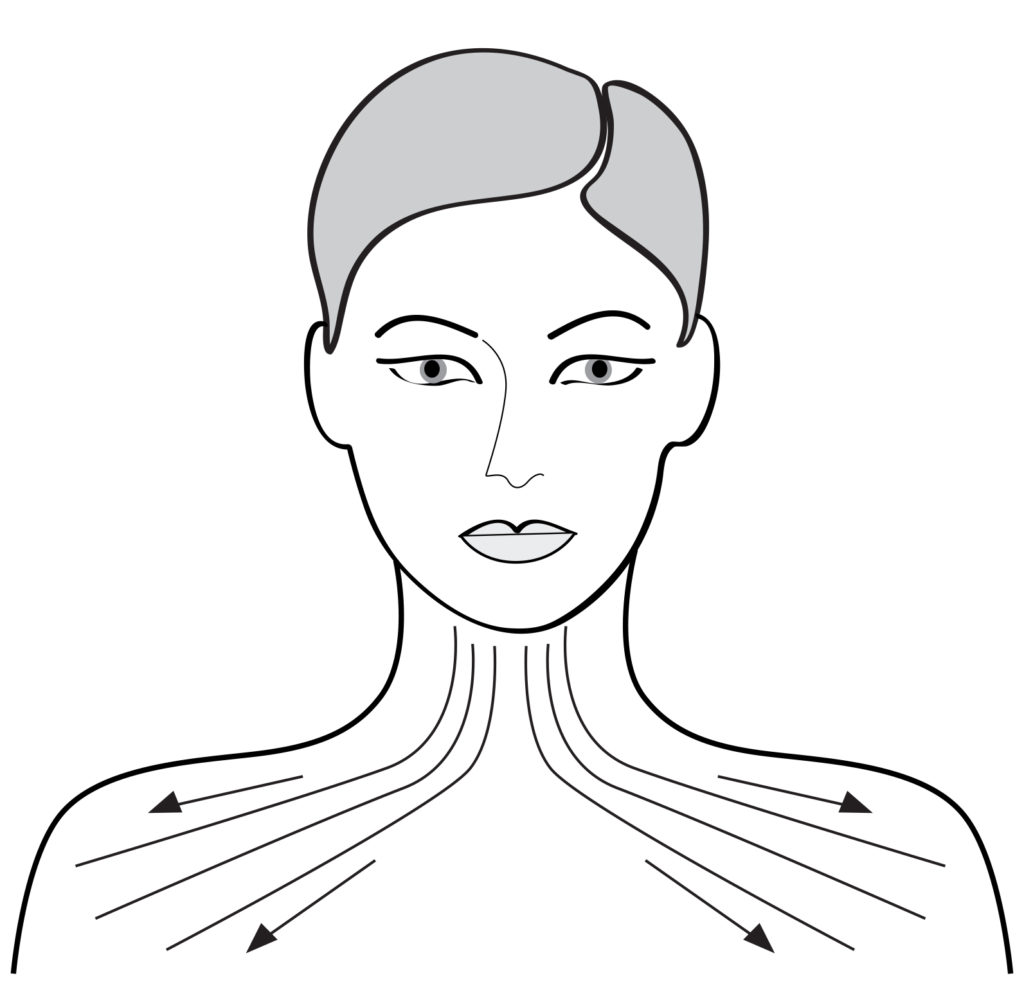
Using you full fingers, stroke downwards from the chin line down through the shoulders.
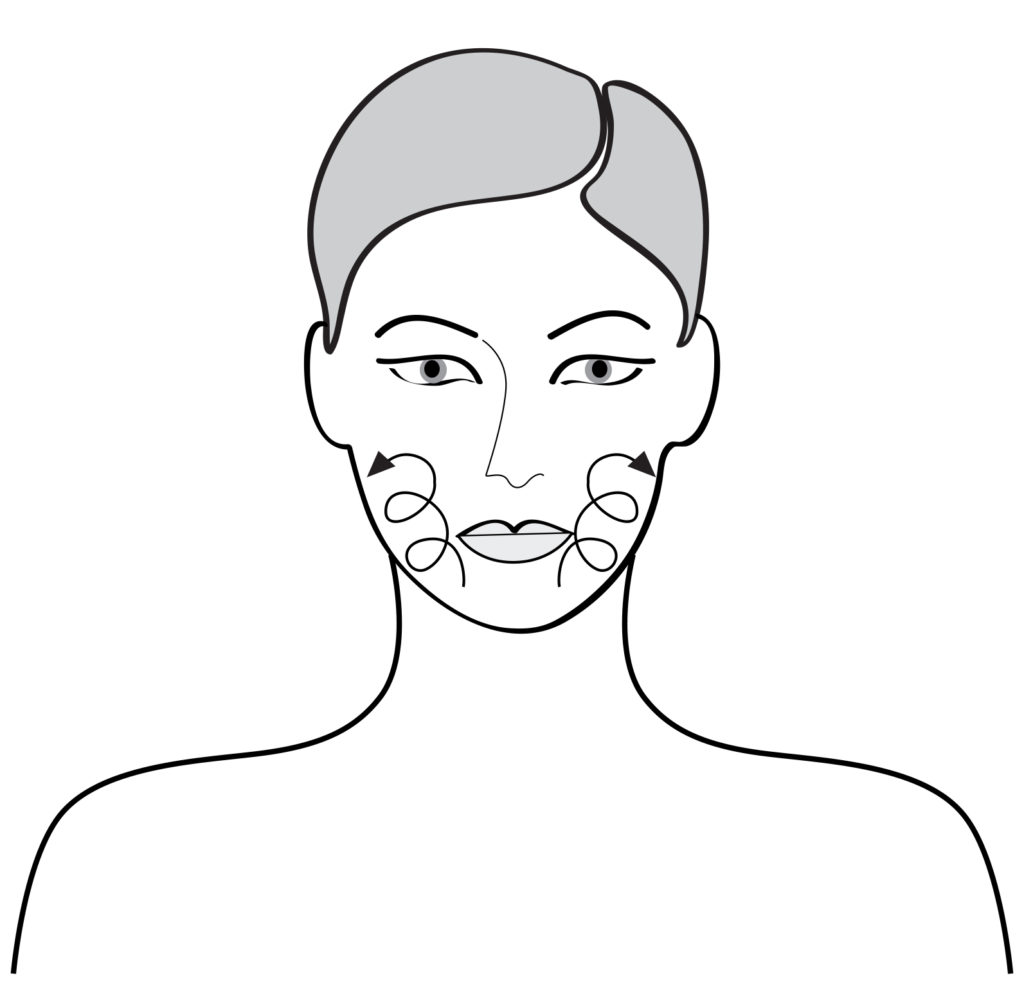
Step 15: Kneading
Knead cheeks and along the jaw down the platisma. On the back of neck, continue with tapotment, rolling, and pinching downwards from base of neck to base of shoulders.
Step 16: Tapotement
Roll and tap on the cheeks, then on the forehead. Transition around the eyes, around the chin and move to step up.
Step 17: Effleurage – Step Up
With your middle finger on the side of the nose, use the pads of your index finger to apply slight pressure, “stepping up” the bridge of the nose to the corrugator.
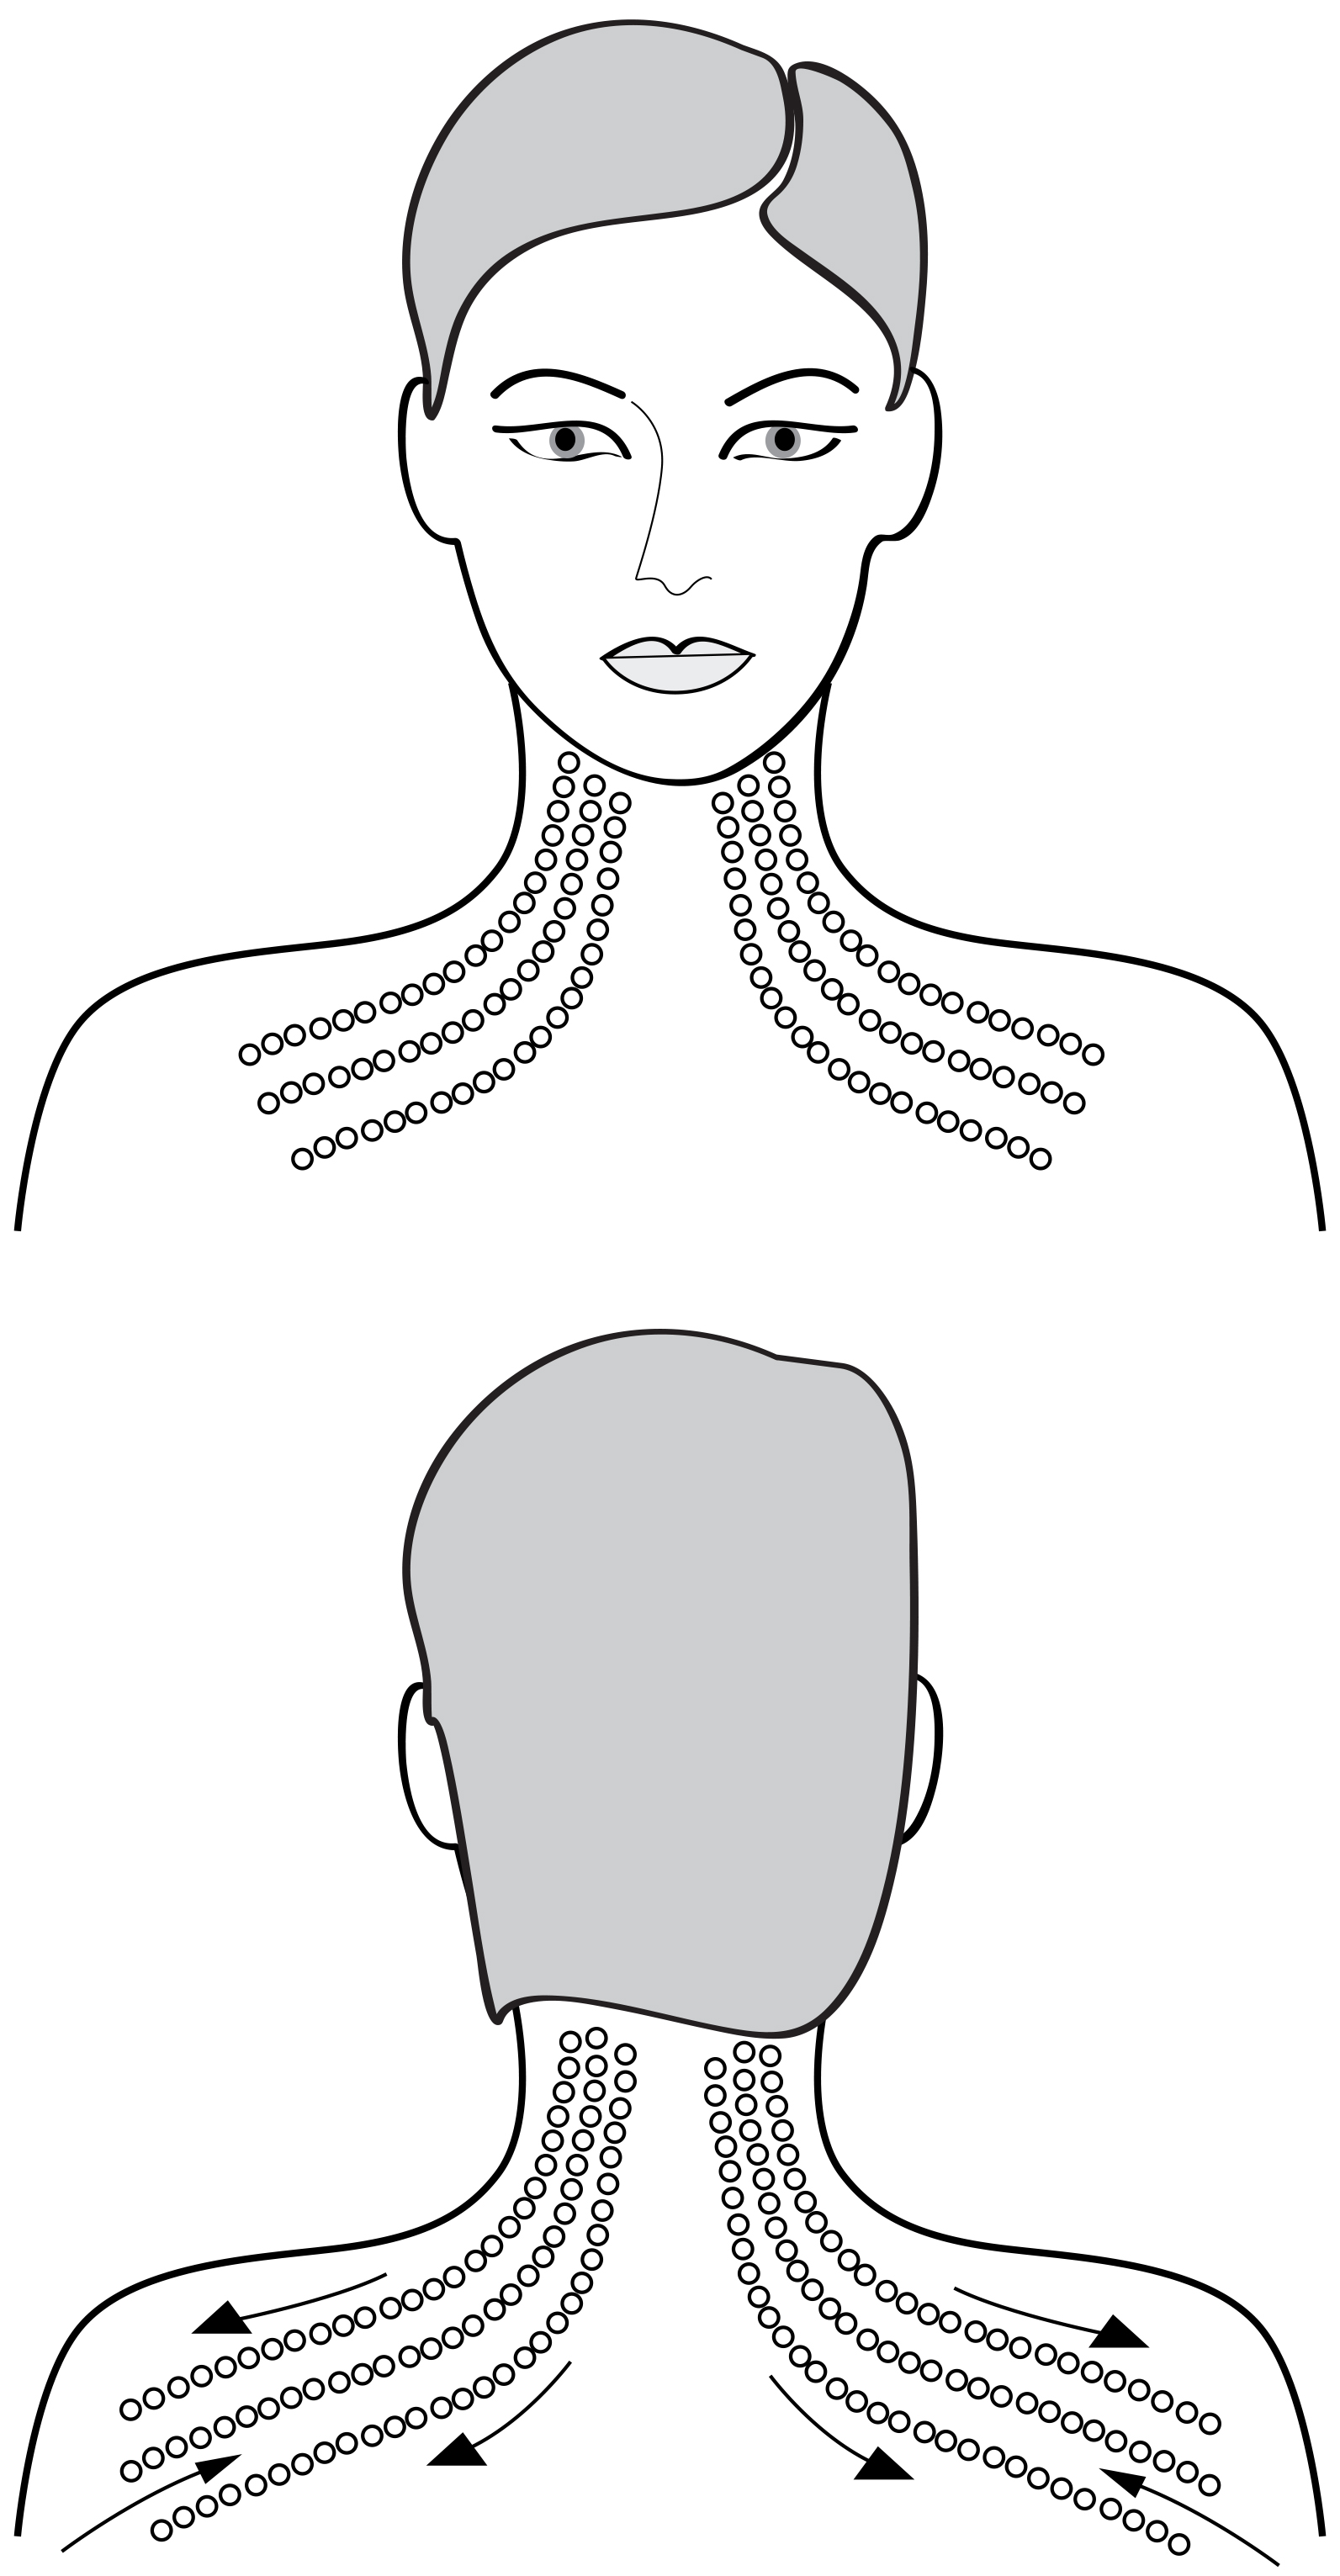
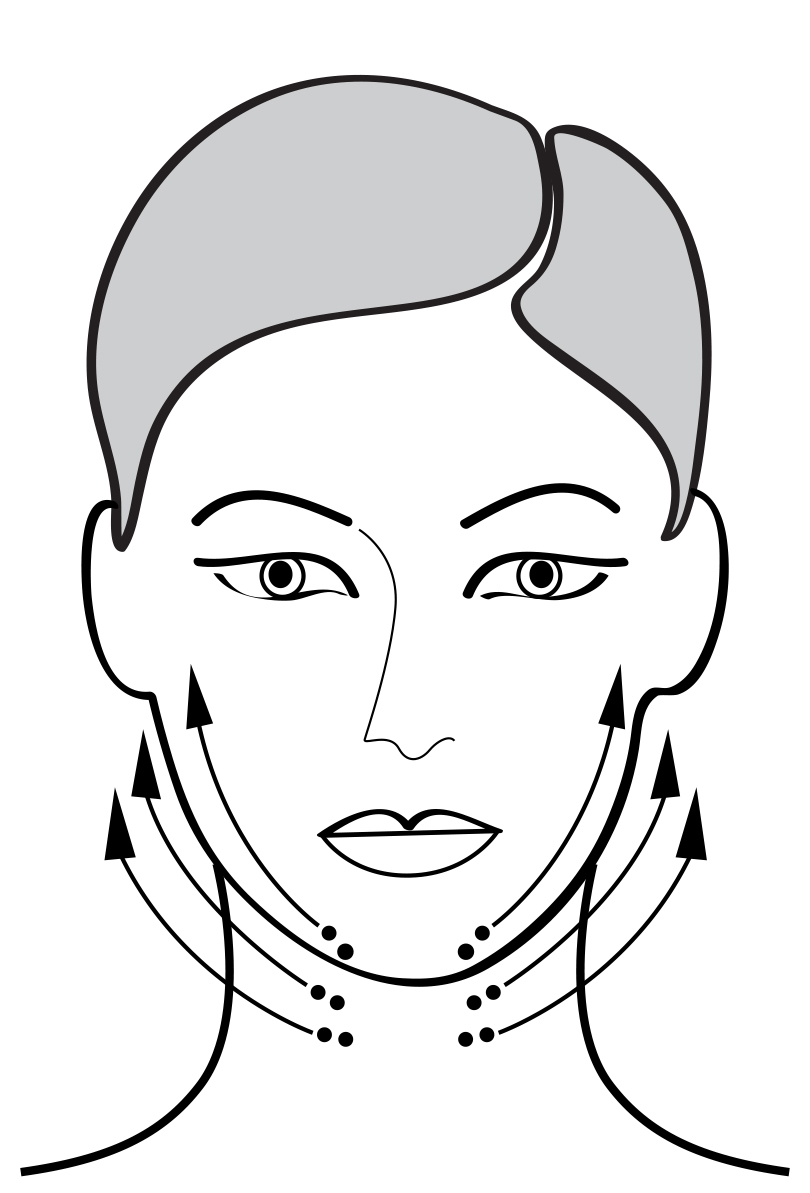
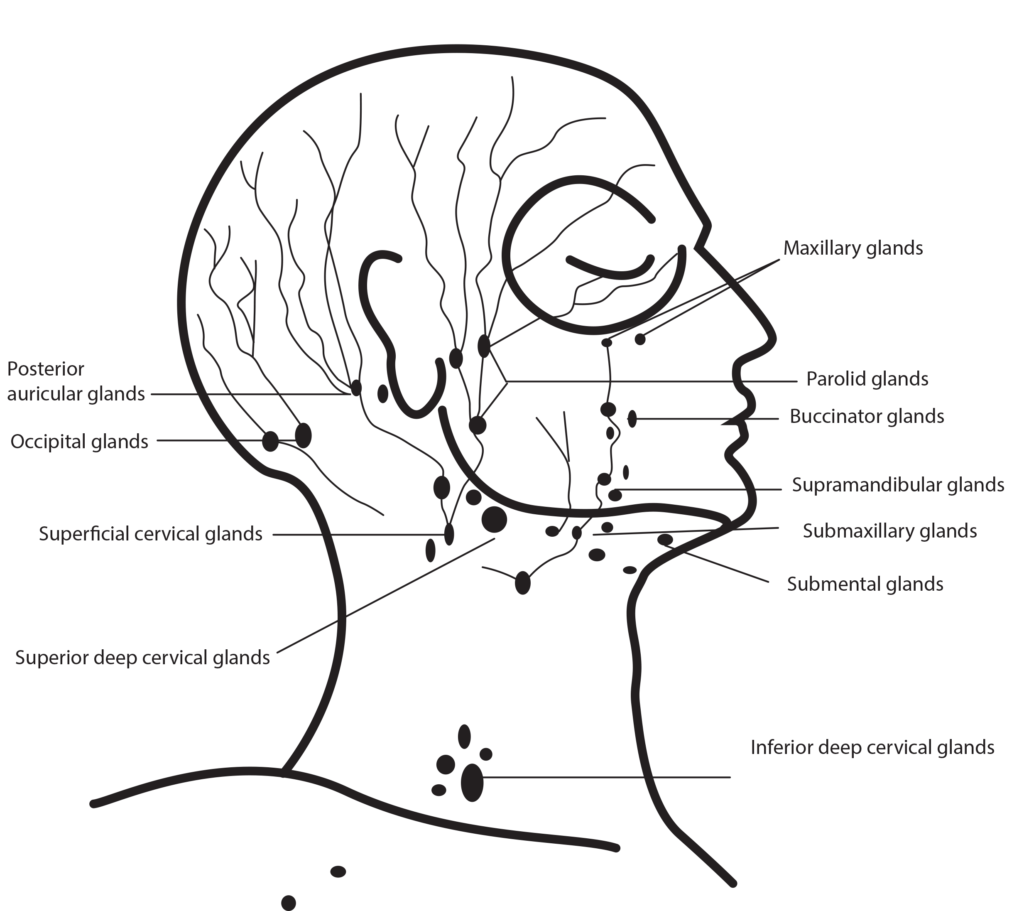
Step 18: Lymph Nodes of the face
Gently pump the lymph nodes towards the head.
Step 19: Effleurage

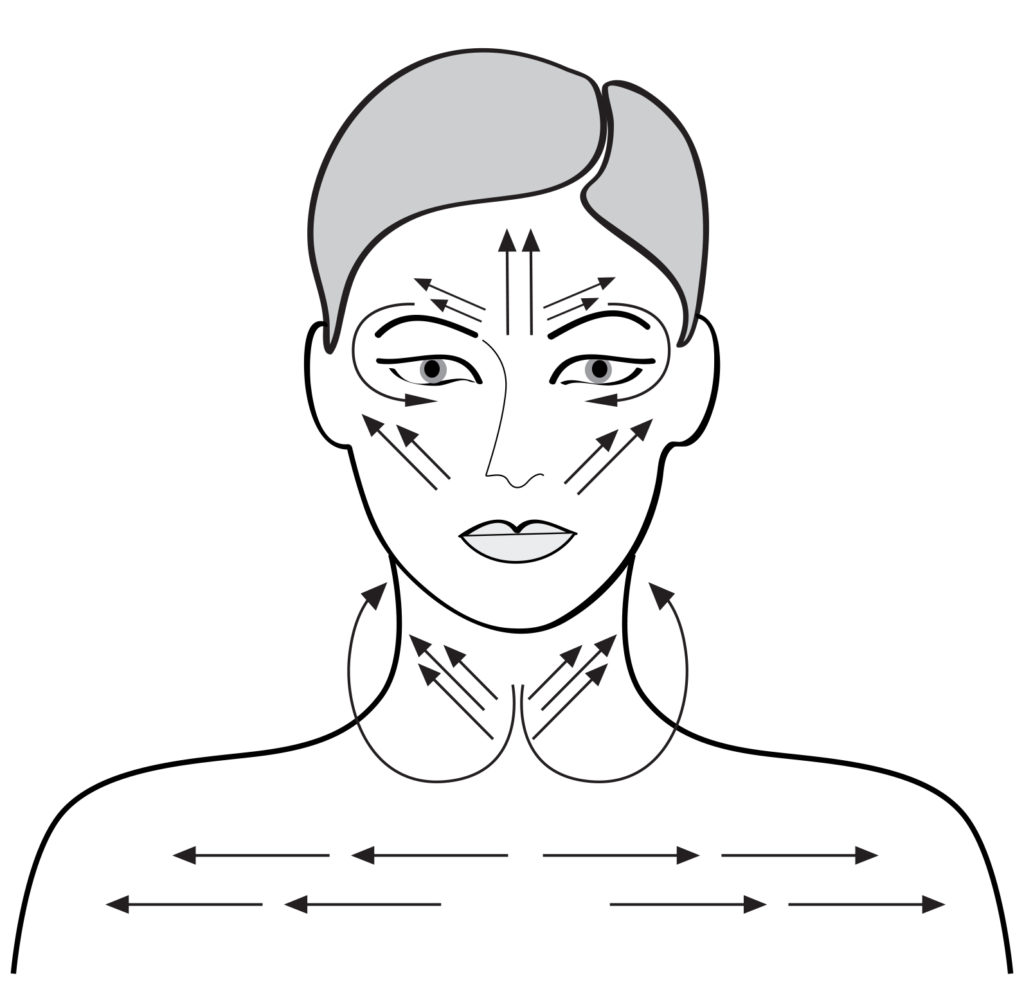
Return to chest area, stroking down from chin to chest. Stroke across chest again, then use upward and outward strokes across upper chest, up through the neck, across the chin and up onto the cheeks. Circle around the outer corners of the eyes then up and out through the forehead.
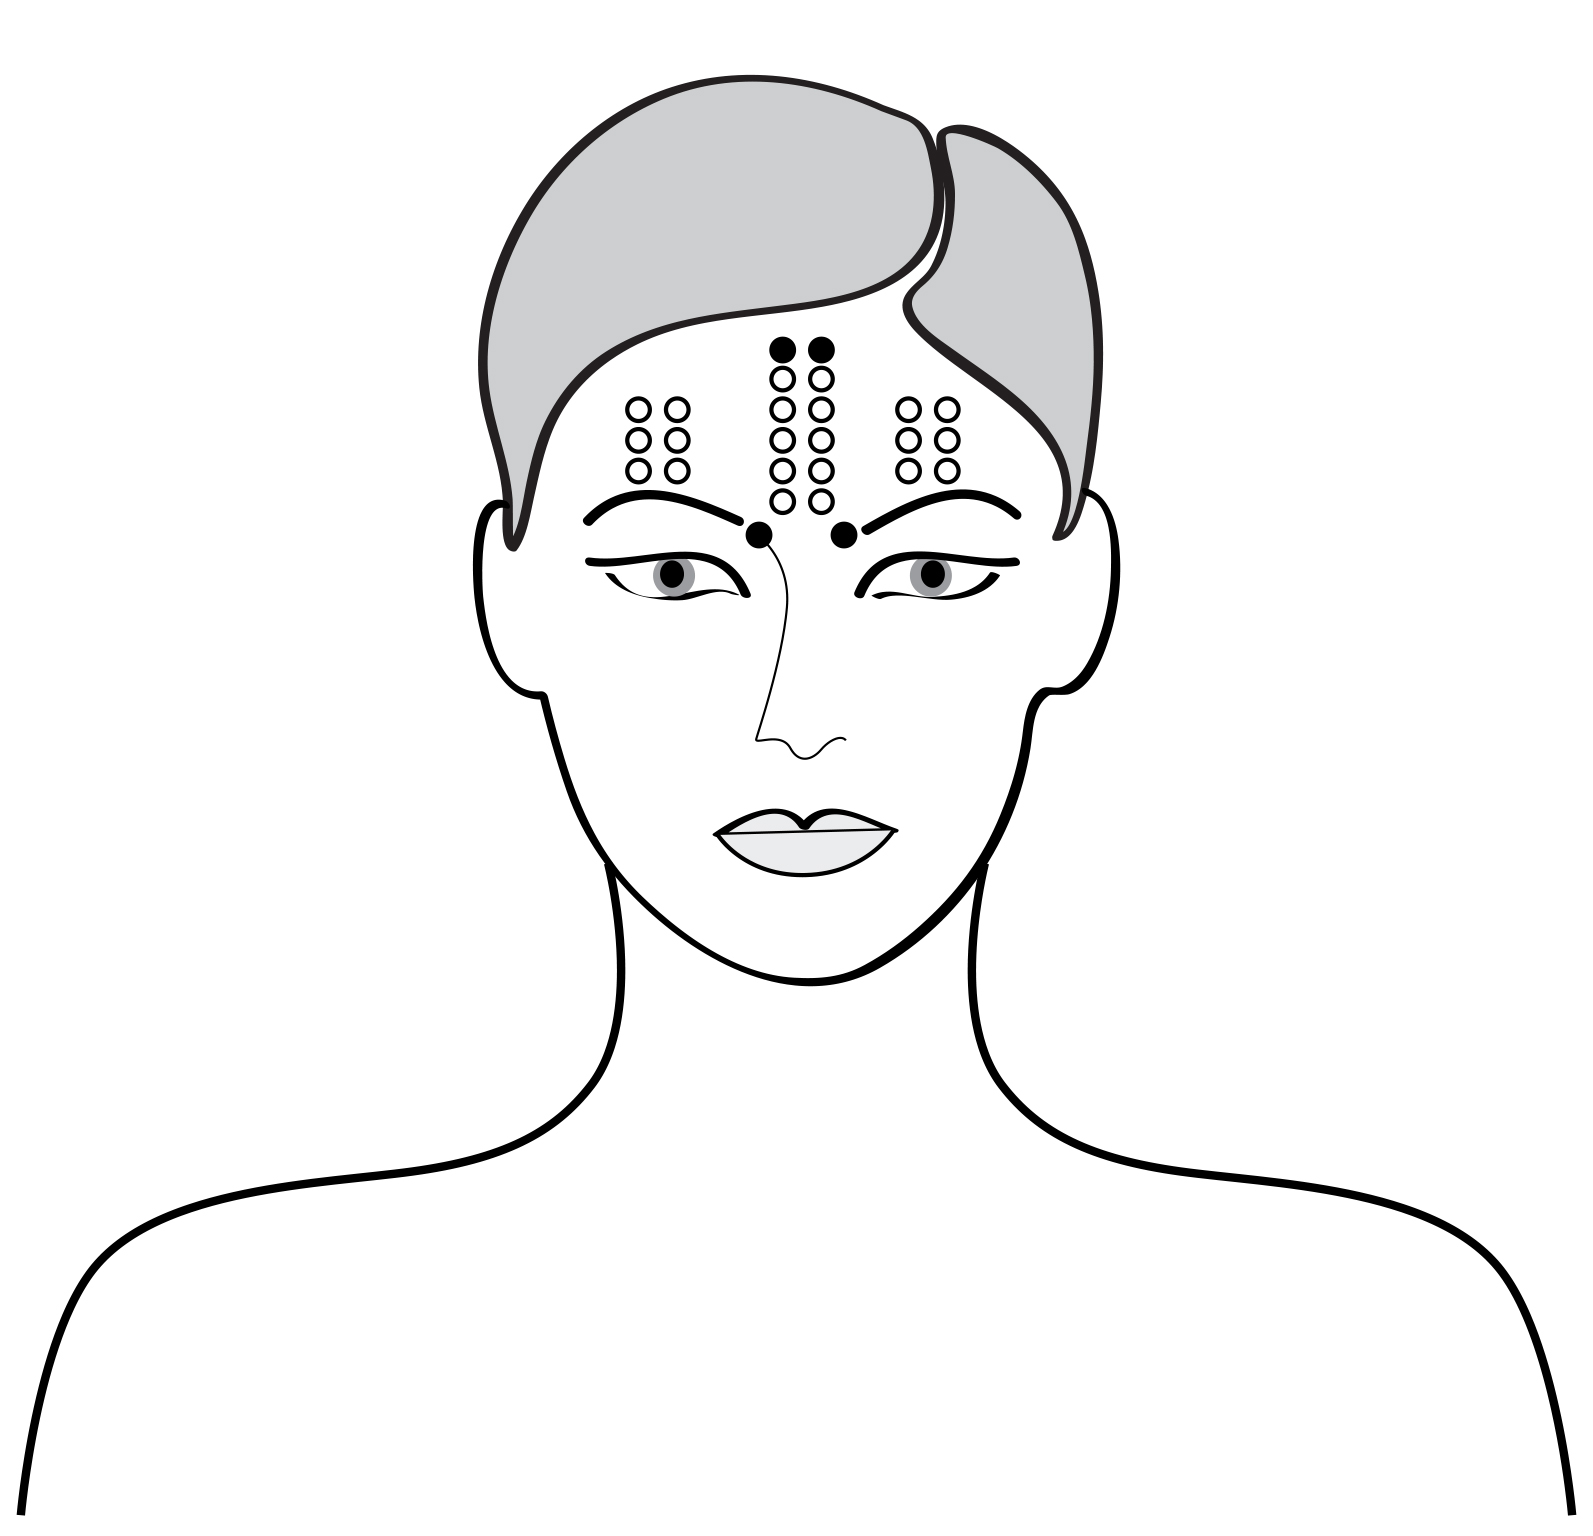
Step 20: Shiatsu
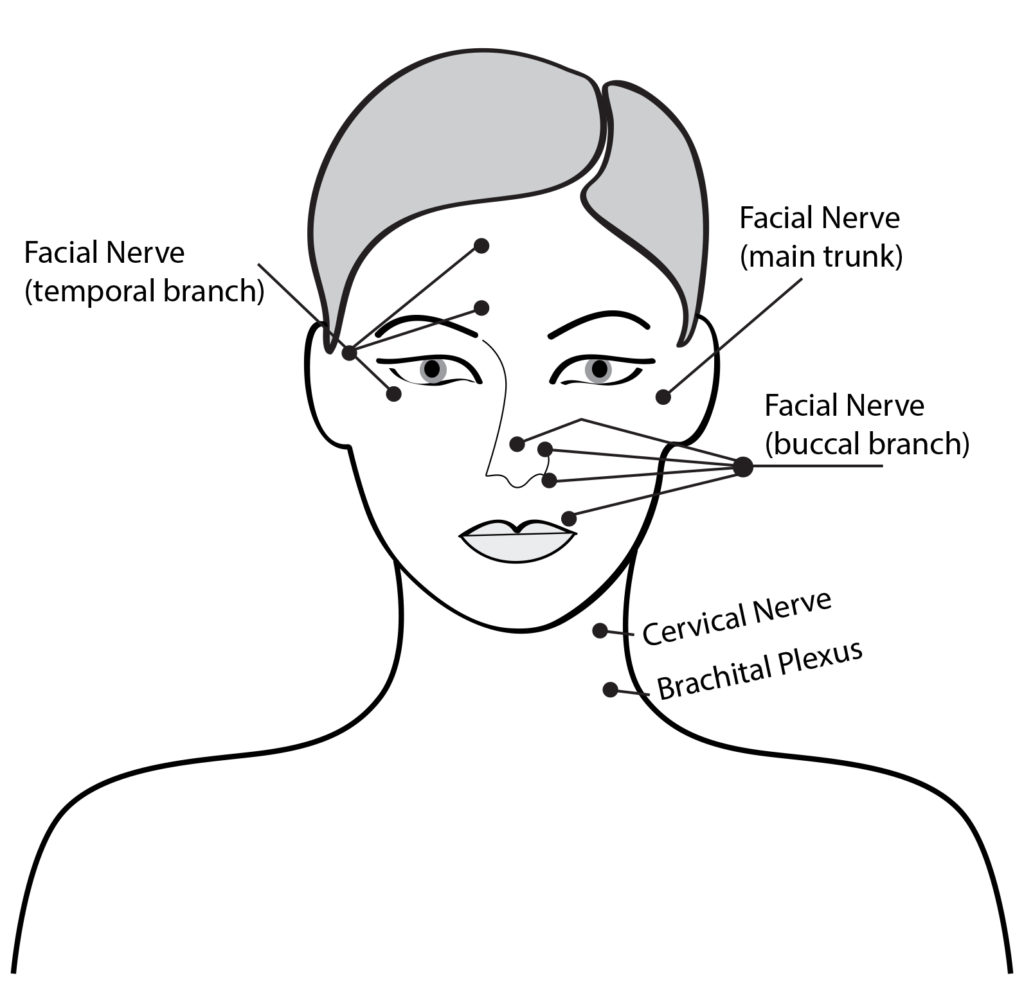
Finish by applying light pressure to pressure points. Reference Motor Points Massage diagram, above right. Apply pressure with balls of fingers. End with light effleurage around the temples, then with gentle pressure on the temples.
Facial Massage for Sensitive Skin – The Silver Ball Massage Technique
Step 1: Slide & Roll
Start the massage by sliding the ball from the chin to the temporal area, applying slight pressure on the temple. Glide the ball towards the bridge of the nose, and then roll the ball downwards, along the Buccinator muscle, located on the area of the cheek just to the side of the mouth, returning to the chin. Repeat this movement three times on each side of the face.
Step 2: Zygo Slide
Start by placing the ball at the bridge of the nose just below the eye, then slowly glide it outwards toward the temporal area. Pause at the temple to apply a small, brief amount of pressure. Slide the ball down towards the corner of the mouth and the back towards the front of the ear. Pause and apply light pressure at this point as for a moment. Return to the bridge of the nose and repeat, performing this movement two to three times on each side of the face.
Step 3: Full Glide
Start from the bridge of the nose, gliding the ball towards the temporal area. Pause and apply slight pressure on the temple. Then, glide the ball towards the corner of the nose, and then back to the front of the ear. Now, glide the ball towards the Digastric muscle under the chin, and then to the back of the ear. Transition to the other side by sliding the ball underneath the chin. Repeat this move for a total of three times.
Step 4: Rolling Zig Zag

Place the ball at the temporal area and roll the ball gently up and down across the forehead area in a slow, steady, single movement, ending at the temple area on the opposite side of the forehead. Repeat this movement for a total of three times.
Step 5: Smooth Wave

Starting at the temporal area, slide the ball upwards towards the hair line along the frontalis muscle located on the forehead. When you reach the hairline, glide the ball downwards towards the procerus muscle located just between the brows on the upper bridge of the nose. Without stopping, glide the ball upwards again towards the hair line, then down toward the temple area on the opposite side. Repeat this in smooth movements for a total of three times.
Step 6: Lifting Slide

To start, position the ball on the side of the nose, in the crease. Glide the ball upwards to the temporal area, pausing briefly to apply light pressure. Proceed by sliding the ball downwards toward the risorius muscle along the side of the mouth, and then move upwards again to the front of the ear. Continue to slide downward toward the digastric muscle, the small muscle located under the jaw, and then back up towards the front of the ear. Perform this entire movement two to three times on each side of the face.
Step 7: Lymph Nodes

Using a gentle pumping motion with the tip of the silver ball, apply three seconds of pressure to the following points on the face: The side of the nose, the front of the ear, back of the ear, the base of the neck, underneath the collarbone.
Here, switch to the opposite side of the face, applying pressure underneath the collarbone, the base of the neck, just under the jaw, the back of the ear, the front of the ear, then finish on the opposite side of the nose.
Step 8: Neck Strokes
Place the ball on top of the collarbone on one side of the body, then gently begin to glide the ball across the neck area to the opposite side, moving slowly back and forth across the neck in an upwards direction until you reach the outer area of the jaw. Without pausing, glide the ball across the jaw, then towards the nose, then outward towards the ear, and finish at the bridge of the nose just under the eye. Repeat on the opposite side of the face.
Step 9: Circle Flow
Begin in the center of the cheek making light, outward circular motions on the zygomaticus muscle.Without pausing, transition towards the eye area to circle around the orbicularis oculi, the muscle surrounding the eye. Perform this two times on each side of the face.
Step 10: Expanding Waltz
Begin this movement on the procerus muscle between the eyebrows, then glide the ball in large circles along the inside perimeter of the face. Without pausing, widen the circle to the outside perimeter, ending at the opposite ear. Repeat this for a total of three times.
Step 11: Orbital Glide
Starting on the Procerus muscle between the eyebrows, begin to glide the ball in a circle eight motion, first over the brow, then under the eye along the orbicularis oculi muscle, then transitioning over the nose to the opposite side, gliding the ball over the opposite brow then circling downward under the eye. Repeat this circle eight movement without pausing for a total of three repetitions.
Step 12: Temporal Area Pressure Points
Use your fingertips to conclude the massage applying light pressure to both temporal areas on the face for five seconds.
A professional facial massage is one of the major differences between a professional treatment in a spa and a home-care regimen. One advantage estheticians have over massage therapists for performing facial massage is the understanding of the skin and products. Massage therapists are not trained in esthetics and therefore are not familiar with correctly treating the skin conditions or whether they are applying potentially irritating ingredients. Estheticians are fortunate to have a “license to touch,” and can use this skill to truly build a successful business.
Learn about our new GLOW and GO! Facial massage and mask protocols that show how you can create a new and exciting environment at your spa with customized facial massages and masks.
*This blog is for informational purposes only and is not intended as medical advice, treatment or diagnosis. Always seek the advice of your doctor or health provider with any questions or concerns you may have about a medical condition.
Dear Lydia
Thank you so much for this great overview. I am working as a Massage teacher in Zürich and I am always looking for simple and informative material like this. Very helpful!
All the best
Maria
Facial massage is beneficial for healthy skin and glowing skin. I have got very good results.
Hello. Do you have a training DVD on facial massage available to purchase?
Please email info@repechage.com
Great post. This post has made it all clear about the facial massage.
Thank you for your informative facial massage routine. The visuals are a great help – I love them.
This is a great post, very informative and the pictures are a great visual help! It great to learn about the different types of facials massage techniques
Hi Madam I am doing a cause for the salon.So I saw your link and learn lot of things for my project.
thank u mam.
Thank you for great refresher. Good to have on hand to review from time to time. My brain gets too full from continuous learning.
Wow, Lydia, you explain every step of facial and its very helpful too beginner. Thanks for this informative post.